How to Make Birthday Cake Pops at Home

Birthday cake pops have become a staple at parties for a reason—they’re fun, versatile, and perfect for any celebration. These bite-sized treats combine the decadence of cake with the convenience of portability, making them a favorite among kids and adults alike. Whether you’re throwing a casual birthday bash or an elegant soirée, cake pops can be customized to fit any theme and elevate your dessert table.
In this guide, you’ll learn everything you need to make birthday cake pops at home, from selecting ingredients to mastering decoration techniques. Let’s dive in!
Table of Contents
What Are Birthday Cake Pops?
Cake pops are essentially mini cakes on a stick. They’re made by combining crumbled cake with frosting, shaping the mixture into balls, and coating them in a candy or chocolate shell. Think of them as the perfect marriage of flavor, fun, and creativity.
Why They’re Perfect for Birthdays
- Interactive Dessert: Guests can grab and go, making cake pops ideal for busy celebrations.
- Customizable: Choose colors, flavors, and designs to match the party’s theme.
- Kid-Friendly: Kids love the fun shapes and vibrant decorations.
- Portion Control: These small treats are perfect for enjoying in moderation.
Step-by-Step Recipe
How to Make Birthday Cake Pops at Home
Equipment
- Mixing bowls For combining cake crumbs and frosting.
- Baking sheet To chill the cake balls.
- Parchment paper Prevents sticking during preparation.
- Microwave-safe bowls For melting candy.
- Styrofoam block or cake pop stand To let the cake pops dry after dipping.
Ingredients
- 1 box Boxed cake mix (any flavor) Follow package instructions to bake.
- 1/2 cup Frosting (store-bought or homemade) Pick a flavor that complements the cake.
- 12 oz Candy melts or chocolate chips Choose colors to match your party theme.
- 20–25 sticks Lollipop sticks
- As desired Sprinkles or edible decorations
Instructions
- Step 1: Bake the CakeStart by baking the cake according to the instructions on the boxed mix. Once baked, allow the cake to cool completely. This step is crucial because warm cake will not hold its shape when mixed with frosting.
- Step 2: Crumble the Cake and Add FrostingIn a large bowl, crumble the cooled cake into fine crumbs using your hands or a fork. Add frosting a spoonful at a time, mixing until the texture becomes moldable. The mixture should hold together without being overly sticky.
- Step 3: Shape the Cake BallsRoll the cake mixture into evenly sized balls, about 1 inch in diameter. Place them on a parchment-lined baking sheet and chill them in the refrigerator for 15–20 minutes.
- Step 4: Insert the SticksMelt a bit of candy melts and dip the tip of each lollipop stick into the melted candy to help secure it. Insert the coated end into a cake ball, about halfway through. This helps secure the stick to the cake. Return the pops to the fridge to let the candy set.
- Step 5: Dip and DecorateMelt the remaining candy melts in a microwave-safe bowl, stirring every 30 seconds to avoid overheating. Dip each cake pop into the melted candy, making sure it is completely coated. Gently tap off the excess coating and immediately sprinkle decorations while the coating is still wet.
- Step 6: Let Them SetInsert the cake pops into a Styrofoam block or cake pop stand to dry completely. Once the candy shell hardens, your cake pops are ready to serve or package.
Tips for Success
Chill, but Don’t Over-Chill
- Why It’s Important: Chilling the cake balls is essential to firm them up, but over-chilling can cause cracking when dipped into warm coating.
- Best Practice: Refrigerate the cake balls for 30 minutes or freeze for 10–15 minutes. Ensure they’re cold to the touch but not frozen solid.
Mind Your Candy Coating Consistency
- Why It’s Important: Thick coating can make dipping a struggle and might cause the cake ball to fall off the stick.
- Best Practice: Melt candy melts or chocolate in short, 15-second intervals, stirring frequently to achieve a smooth, pourable consistency. Add 1 teaspoon of vegetable oil or coconut oil if the coating is too thick.
Prep Your Workspace
- Why It’s Important: A clutter-free, organized setup makes the process faster and less stressful.
- Best Practice: Arrange all tools—lollipop sticks, sprinkles, and parchment paper—before you begin dipping. Keep a damp cloth handy for cleaning sticky fingers.
Anchor the Sticks Securely
- Why It’s Important: Sticks that aren’t properly anchored can slip out of the cake ball.
- Best Practice: Dip the tip of each stick into the melted coating before inserting it into the cake ball. This “glue” helps secure the stick in place.
Work Quickly but Calmly
- Why It’s Important: Candy melts harden fast, leaving little time to add sprinkles or decorations.
- Best Practice: Decorate each cake pop immediately after dipping, or work in small batches to avoid rushing.
Avoid Cracking and Uneven Coating
- Why It’s Important: A smooth, uncracked coating is key to a professional look.
- Best Practice: Let the chilled cake balls sit at room temperature for 2–3 minutes before dipping to minimize the temperature difference between the cake and coating.
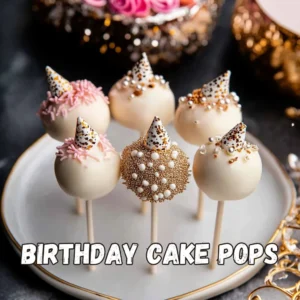
Creative Decoration Ideas for Cake Pops
Theme-Based Designs
- Birthday Themes: Add numbers, balloons, or confetti sprinkles for a festive look.
- Characters: Create faces of animals, superheroes, or princesses using edible markers and fondant.
- Seasonal Themes: Use snowflakes for winter birthdays or flowers for spring celebrations.
Advanced Techniques
- Drizzle Art: Use contrasting colors to create a drizzle effect on top of the pops.
- Marble Coating: Swirl two colors of melted candy for a stunning marbled finish.
- Textured Coating: Roll cake pops in crushed cookies, nuts, or coconut flakes before the coating dries.
Serving and Storing Birthday Cake Pops
1.Serving Birthday Cake Pops:
- Display Creatively:
Use a cake pop stand or Styrofoam block to hold them upright. This not only keeps them neat but also turns them into a centerpiece.
For themed parties, consider decorating your display area with matching tablecloths, confetti, or props. For instance, a princess-themed party could have a tiara placed next to the cake pops. - Offer Variety:
Provide cake pops in different flavors, colors, and designs to cater to various tastes. For instance, pair classic vanilla with chocolate and throw in a colorful funfetti option for kids. - Keep Cool in Warm Weather:
If you’re hosting an outdoor party, keep the cake pops out of direct sunlight. Place them in a shaded area or store them in a cooler box lined with ice packs until serving time.
2.Storing Cake Pops:
Proper storage extends the shelf life of your cake pops and keeps them looking as good as when you made them.
Short-Term Storage (Up to 3 Days):
- At Room Temperature:
Store completed cake pops in an airtight container lined with parchment paper to prevent sticking. Keep them in a cool, dry spot away from heat or humidity.
Long-Term Storage (Up to 2 Months):
- Freezing Undipped Cake Balls:
- Roll the cake mixture into balls and place them on a parchment-lined baking sheet. Freeze until solid, then move them to a freezer-safe bag or container for storage.
- Thaw cake balls in the fridge for several hours before dipping and decorating
Birthday Cake Pops for Special Diets
If you’re catering to guests with dietary restrictions, here are some alternatives:
- Gluten-Free Cake Pops: Use a gluten-free cake mix and ensure decorations are also gluten-free.
- Vegan Cake Pops: Opt for a vegan cake recipe and dairy-free chocolate coating.
- Sugar-Free Cake Pops: Substitute traditional frosting with a sugar-free version.
FAQs About Birthday Cake Pops
1. Is it Possible to Make Cake Pops in Advance?
Absolutely! You can prepare cake balls up to two days in advance and dip them closer to the event.
2. How Do I Melt Candy Melts Properly?
Melt candy melts in a microwave in 30-second intervals, stirring between each until smooth.
3. Can I Make Cake Pops Without Sticks?
Yes, you can! These are often called cake truffles and are just as delightful.
4. What If My Cake Pops Fall Apart?
Ensure your cake balls are chilled and the frosting-to-cake ratio isn’t too soft.
5. Are Cake Pops Gluten-Free?
They can be made gluten-free by using a gluten-free cake mix and frosting.
Conclusion
Making birthday cake pops at home is a fun and rewarding way to add a personal touch to your celebrations. These tiny treats are not only delicious but also endlessly customizable to match your party theme. Whether you’re a baking novice or a seasoned pro, this guide equips you with everything you need to create show-stopping cake pops that will delight your guests.
So, gather your ingredients, unleash your creativity, and get ready to make a dessert that’s as memorable as the celebration itself. Start your cake pop adventure today and make your next birthday party one to remember!